guide/Making Layouts and Applying to Frames
Building A Layout
How PitBull 4 approaches frames is slightly different. Instead of customizing each frame individually, you set up as many or as few custom layouts for frames and then apply them to the frames you want to use that layout. This is very useful if you like having one layout used repeatedly in your UI.
First Go to the config menu drop down and pick "solo"; - this will put a number of frames that are typically called "Singletons" on your screen.  Here is a view of the frames that will load after you spread them out.
The frames that are singletons are (These are spread out above in left to right order):
- Player (that's you)
- Player's Pet (used for pet classes AND when the game gives you a “pet” to use including vehicles, such as in Flame Leviathan)
- Player's Pet's Target (what your pet is on)
- Target (What you personally have targetted)
- Target's Target (What you are looking at has targetted)
- Target's Target's Target (What the Target of your Target is looking at)
- Focus (if you set a focus in-game)
- Focus's Target (what your focus is looking at)
- Focus's Target's Target (what your focus has targeted has targetted)
Now not everyone wants to use every one of those singleton frames. I personally do not use target's target's target cause that's just more than I ever wanted to know sometimes. If you are like me and want to turn those frames "off"; then all you need to do is:
- Choose "Units" from the left column.
- Using the drop down menu labeled "Current unit" select the frame you do not want to see.
- Uncheck the box labeled "Enable"
- Repeat step 2 and 3 until you are left with those singleton frames you want to use.
Frames that appear in the drop down with an asterisk (*) next to their name are frames that use a significant amount of CPU time compared to other singleton frames.
Feel free to move your frames you have left to make them more visible or where you eventually want to anchor them on the screen. (You may need to go to the Frame Movement drop down to Unlock your frames to move them. Its Just to the right of the Config Mode Menu.) - More about moving frames in the "Pro Tips" section below.
Step One: Setting up Layouts
PitBull 4 comes with one layout installed called "Normal." Now normal has a lot of information on it and serves as a great starting point for building your first layout. And most people like to start with their own personal frame so let's use that frame as our example.

Here is an example of the "Normal" layout prior to any tinkering.
To make a new layout type whatever you want to call it in the "New Layout" box. It will use whatever frame is visible in "Current Layout" as the base for this new layout. I called mine "Standard Bar" (cause I'm a boring person or something) Hit enter or press the "Okay" button that appears when you type in that box to finalize your name.
Now you need to decide what you want to see or don't want to see with this layout.
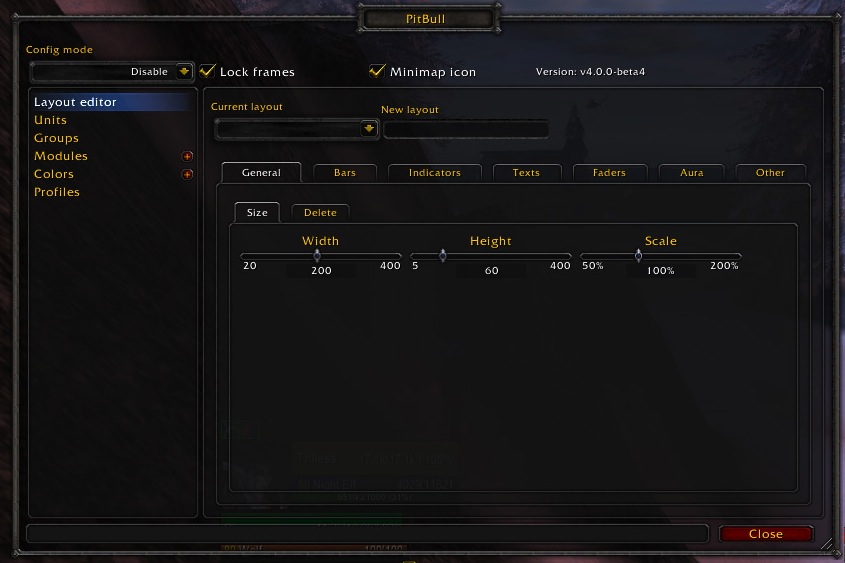
The General Tab

- Let's you change the height, width and scale of your layout.
- Strata is the layer on your screen, if you set this to a high level, you end up with PitBull Layered over top of things like your spell book. The default of "Medium" is what most people will find the right level.
- Also let's you delete that layout.
Bars

How each bar looks and what bars you want to show:
- General - Provides a place to set one texture for all your bars. Also the spacing between bars on the frame and the padding around the frame
- Blank Space (some people may want to add blank bar(s) for spacing, or to separate text from other bars onto its own bar.)
- Cast Bar
- Experience Bar
- Health Bar
- Power Bar - this is for mana/rage/runic power/focus/etc. You can also set it to only show mana bars and not other "power"
- Reputation Bar
- Threat Bar - show your threat in a bar. Useful if you happen to be that Hand of Salvation person, as one example.
Indicators

All those cool icons that show up that let you know you are in combat, flagged pvp, ready check, etc (Also the portraits are located here)
- In addition to moving these little icons around on your frame (the original "Normal" layout you start with uses the same locations as the default Blizzard UI) you can add or remove portraits to frames here. If you do add a portrait you can go with a variety of styles and fall back style for when you are out of range of someone.
- This is also where you will find the Class Specific Indicators such as Totems, Runes, Combo Points, Etc. layout items. These features are only available for customization if you have the ability to use totems, Runes and Combo Points. (In other words, you can only work on your totems layout when you are on your shaman.)
Texts

All the words on the bars
- Texts on the frames can be customized using either DogTags or with LuaTexts. The default PitBull 4 value is to use LuaTexts. There are many pre-loaded values available in both varieties. If you want something more custom you can certainly add or find someone that can assist you with adding the code to change these values.
- Additional Information on how to Customize Texts can be found in the Working with Texts section of the Guide.
Faders

The ability to make your frames fade based on range, combat or hurt status, and hostility.
Aura

Auras are buffs, debuffs, weapon buffs, etc
- Buffs and Debuffs are shown in a couple different ways. First, there are the small box icons. You can choose to use those icons, or perhaps you don't want to show that because you use another buff/debuff add on.
- You can choose to show only Buffs/Debuffs you put up. OR only ones that you didn't put up. You can set your own buffs/debuffs that you put up in a different size compared to those put up by someone else.
- You can adjust the cool down timer on those boxes to be just a time remaining spiral OR you can add text with cool down time.
- Additionally there are highlights - Highlights can add a border around the whole frame highlighting different buffs or debuffs you want to be aware of. For example, as a mage perhaps you want to highlight curses or as a healer you may have multiple things you want highlighted as removable by you.
- Turning off the icon boxes does not turn off Highlights. So you can have frames that highlight without icon boxes. If you don't want to see highlights you need to uncheck "enable" on the highlights sub tab.
- Additional information about Aura customization is in the All About Auras section of the guide.
Other

- You want to adjust colors of borders for elites or rares - its in here
- You want to turn off aggro indicators on a particular layout (but have it available for other layouts) - its in here.
- You want to turn on or off cast bar latency indicators
- You want to add a background color to the frame
- You don't want to use visual heal in a layout, but do want to use it in some others - its in here
The great place to get started is to decide what you don't want to see on your basic layout and to turn those features off. For example, on my hunter I don't want to see a threat bar indicating threat since I use a threat meter for that information. This will vary greatly from frame to frame. For example, on my frame I like having a reputation bar, because I like farming up reputation. I also like seeing my own mana because that's important to me. However, in a raid, as a hunter I don't want to see everyone's mana bars. So when I make raid bar layouts, I turn that off. While I do care about my own experience bar when I'm leveling. I don't really want to see an experience bar on my target frame.
Now if you are a visual person when you like to tinker with your layout (and alot of people are!) you are probably sitting there going "I check and uncheck boxes and nothing is happening! Its broken! ARGH!" but keep in mind we have just been discussing how to set up a layout. We haven't actually applied it to anything yet.
Step Two: Applying the Layouts to the Frames
So you have set up a layout (or you at least have read through some of the above guide on setting it up) and are ready to apply it to the frames.
Since we are starting with the Singleton frames, you want to choose "Units" from the left menu. (Party and Raid will show up under "Groups" we will cover those later on)  Units Menu should appear something like this image, although newer versions may have changes
From the drop down menu pick the frame you want to start with (in our example we started with our own frame - Player)
Select the layout you just made from the "Apply Layout" drop down option.
You've now applied the layout you just made to to the Player frame! You may find you need to go back up to the Setting up Layouts section to refine your frame layout further.
Once you're happy with your own player layout, then its time to look at the other singleton frames. Do you want those frames to look identical to your Player frame? If so then just apply the same layout to those frames. If you want them to look differently, then you need to make a new layout. You can use either "Normal" or your new layout as a starting place for your new layout. When you finish with Singleton frames, then its time to move on to more advanced layouts with Party and Raid groups.
There are several Sample Frames here for you to get your imagination flowing. The ones at the top are simple samples of the basic concepts, the ones towards the bottom are actual working type examples.
Pro Tips:
- Moving frames
- The default function in PitBull has a "snap to" feature that will have frames attach to each other when they are moved closer together. If you want to adjust your frames without the snap to feature, hold down "shift" while dragging the frame. You can also use the "Frame Movement" menu to turn off the snap to feature.
- Slider Adjustments
- Most of the slider options in PitBull also have a box below them that will state the current size. You can type in that box (and press enter) if you prefer to fine tune your adjustments without the slider feature!